Sunday, February 23, 2014

Fortified Chapel

Hi, folks. Here's another bit of terrain for our Kings of War table. It's a fortified chapel made from a Pegasus Hobby Gothic City Building Large Set. I added crenelations with some 1/2 inch foam core. This was another mostly done project from a while back which I finally finished. I did final touch-up painting and added some print-outs of stained glass windows from the Hirst Arts site which I resized in GIMP. 


Well, there's another finished piece of terrain thanks to Kings of War.

Friday, February 21, 2014

Modular Pink Foam Castle

Pink foam castle
Here's a little castle I made with 1/2 inch insulation foam. I watched some really good tutorial videos on the Wargaming For Fun site. They used two inch thick foam for their castle but all I had was the 1/2 inch. I scribed the foam with a pencil to represent the stones. The walkways are 3 inches wide to accommodate the unit's movement trays. The walls are 7.5 inches tall to the tops of the merlons. The towers are simple boxes with the crenelations added. I had to add the buttresses to the walls because they tended to fall over in the breeze from the ceiling fan. It was painted with black craft paint, an entire 8 oz bottle, and then drybrushed with gray craft paint. It took forever to scribe the lines and was a kind of tedious project, but it cost next to nothing. I already had several pieces of foam insulation, all I needed was a $3 bottle of paint. It comes apart into 4 sixteen inch wall sections and 4 towers and weighs about nothing. I still need to make a gate and maybe a portcullis. I may also add a few more courses to the tower bases so I can add doors from the towers onto the walkways. 
That tall tower in the center courtyard is a modified Hirst Arts Prison tower my son Mark made. It's pretty cool. We may be able to use it in some kind of rescue scenario. And of course, Kings of War has some siege rules.

Thanks for looking.

Wednesday, February 19, 2014

Armies for Kings of War

Here's a little bit on our King of War Armies. We're using a mix of old Warhammer minis primarily, Mantic does not yet make a Kingdoms of Men line of minis, so I'm using some old Warhammer Empire minis. I had some already painted, but most were not.

First I started out making some movement trays. There is an excellent tutorial on YouTube on The Kings of War Channel. If you haven't visited this channel, you should check it out. It's excellent. Entertaining and informative. Anyway, I had made homemade movement trays in the past, but never ones where the minis are glued onto the movement tray. I really liked his method, especially the way he used the blended flocks and matching the flock to his battleboard. I spent a day making a bunch of movement trays for our units.

At the same time I was pulling out all of the old minis we had, and grouping them into units for the different armies. Then I found a really cool, free online site for building Kings of War army lists. It's called EasyArmy.com and here is a link to their Kings of War page.This is an excellent resource that lets you make lists using the latest rules and items. I was using it to design the army lists based on the minis I had available and looking at the army lists let me figure out how many and what size movement trays I needed. Kind of a circle of life thing. :)

Here are some of the Kingdoms of Men units.
First one is the General on a Winged Beast. It's a GW Empire Knight conversion mounted on GW's Louen Leoncoeur's Griffin. I finally finished painting the Griffin for use with Kings of War.
Another old GW mini. This one was painted about 10 years ago I think. He will be a General mounted on a horse for KoW. It's nice to have models matching the different equipment options available.
 Another old GW mini, a wizard on foot for KoW.
 Wizard mounted on a horse. 
Wizard mounted on a Pegasus. This one is a Heroscape mini. I just added flock to the base. That covers the options for Wizards,
 Cannon. More old GW minis, painted long ago. I based them on a piece of vinyl floor tile.
 Ditto, with an old Hellblaster. Sat around unpainted for about 10 years. 
And a mortar, too.
Pole Axe Regiment.  Another old GW unit. This one I just finished painting. I made their movement tray using the method from "The Kings of War Channel". It was very helpful, gluing that Standard Bearer down to the tray keeps him from falling over all of the time. The emblem on the standard itself is one I googled, brought into GIMP and reversed colors from a black Maltese Cross to white. Then I printed a page of the emblems, cut them out and glued them to the standards. When dry, I sealed the standards with gloss decoupage.
Here's a Spearman regiment. Movement tray done the same way. Same deal on the banner. These guys were a departure from the usual way I paint minis. I bought a can of blue spray paint and used that on them. The paint was darker than I thought it would be but I'm okay with it. I then picked out the breast-plates, skin, shields and spears. I may start playing these guys as a Pike Phalanx.
A hoard of Footguard. Half of these were painted a long time ago. Same deal on the movement trays and banner. 

Well, that's it for now. Thanks for looking. 


Tuesday, February 11, 2014

Kings of War is our New Game


Hi, folks. First post in a long time. Real life has been kind of sucky and I haven't been up for blogging. Now all of a sudden Mantic Games' "Kings of War" has got my mojo back. :)

I think Mantic is the successor to the Games Workshop mantle. At least for me. I had a lot of GW minis sitting around gathering dust for the last 12 years or so. Kings of War has given them a new "life".

If you're not familiar with Mantic's "Kings of War", it is a Fantasy Mass Combat Tabletop Wargame. Mantic has an excellent, free ruleset you can download from their site, written by Alessio Cavatore. If you google them, you can find lots of positive reviews.

Anyway, after watching some excellent YouTube videos from the "Kings of War Channel" and Wargames Supplies, I started reviving those old Warhammer Armies for use in "Kings of War". So far, my sons Stephen and Mark and I have played several games of "Kings of War", using an old GW Empire army for the "Kings of War" Kingdoms of Men faction, an old Vampire Counts army for KoW Undead, Dwarves, Warriors of Chaos, High Elves, and Dark Elves (Mantic Twilight Kin) .

To me, KoW plays so much better and the fact that we can use old GW armies in KoW makes it that much more attractive. I'll be posting some articles on Kings of War soon.

Thanks for looking.

Monday, May 27, 2013

The "insert your name here" Inn

Hi, folks. This is a little Inn my son Mark built a while back using a "Buildings of Malifaux" set made by WorldWorks Games for Wyrd Miniatures. This was made from 1 Building set and 1 set of clips.  Others have reviewed these sets in the past so I won't spend a lot of time talking about it. I don't like it much. It's wonky when you try to build upwards and the plastic clips get in the way of furniture placement. Graphics are nice, though. This is mainly about some of the furnishings, most of which are Hirst Arts.

Three story Inn. As you can see, it doesn't stack too well, but the graphics are good.
 A different angle. 28mm D&D minis for scale.
Another angle. I like the balcony these sets allow.
A shot of the top floor with the roof removed. The rug has been featured in previous posts. The bookcase is an old scratchbuild. Globe from Dollhouse set, the bed is another old scratchbuild. I imagine this as a suite of rooms, perhaps for nobles or mages.
 A shot of the second floor. Most of the furnishings are Hirst Arts, though the bed on the right is a scratchbuild with a quilt printed from an online site.
Another angle shot of the second floor. Mainly HA furniture.
Here's a shot of the ground floor bar and patio. Most of the furniture is HA. The narrow table in the upper right is another old scratchbuild.
Another shot of the ground floor. Furniture HA. I used the rug to help hide the clips on the floor.

I'm thinking about making an Inn from foamcore and adding HA pieces for floors and wood planks for the half-timbered look. Might make it a modular collection of rooms like Bruce's latest tutorial on making his Inn, in order to cut down storage space.

Thanks for looking.

Friday, May 17, 2013

Some more dungeon furniture

Hi, everyone. Here are a few more dungeon items. All of these are scratch-built. I forgot to take some in progress pics, though, so I added some after the fact.

Summoning Circle
 The base of the Summoning Circle was made from Hirst Arts Fieldstone parts.

 These are the 2 types of bricks used. The 3 stone piece on the left makes a circle 2 1/2 inches wide. These were used to make the base of the Summoning Circle, pictured below. The longer, 5-stone piece makes a 2" circle.
Big circle above, smaller circle below.
Smaller circle above. Naturally I ran out out bricks for the re-enactment. 
 Pic above: First I tried freehanding cutting out a pentagram. I suck.
Then I printed out a pentagram, much better.
The Pentagram on top was made by printing out a pentagram found with Google. I glued the Pentagram onto thin plastic card, then cut out the Pentagram shape with a hobby knife.

The pentagram was then glued to a circle of plastic card. I then painted the pentagram and glued it to the Hirst Arts pedestal base. I added the red gems by gluing round pieces of plastic card punched out with a 2mm hole puncher. The gems were them painted red with Tamiya Clear Red (TCR).
The Summoning Circle in its natural habitat.

Altar
This Altar was made from some bits from a custom mold and some Hirst Arts bits. The top was cut from a piece of vinyl floor tile.
                           
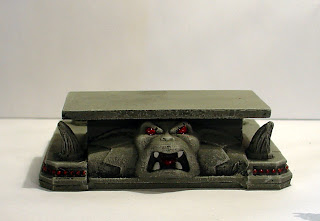
 Front view: The red gems, tongue and eyes were done with TCR.
 Side view: The Altar was mounted onto a piece of craft foam.
 Back view: I left room behind the altar for a mini to stand.
 Other side: The paint job was a series of grays drybrushed up.
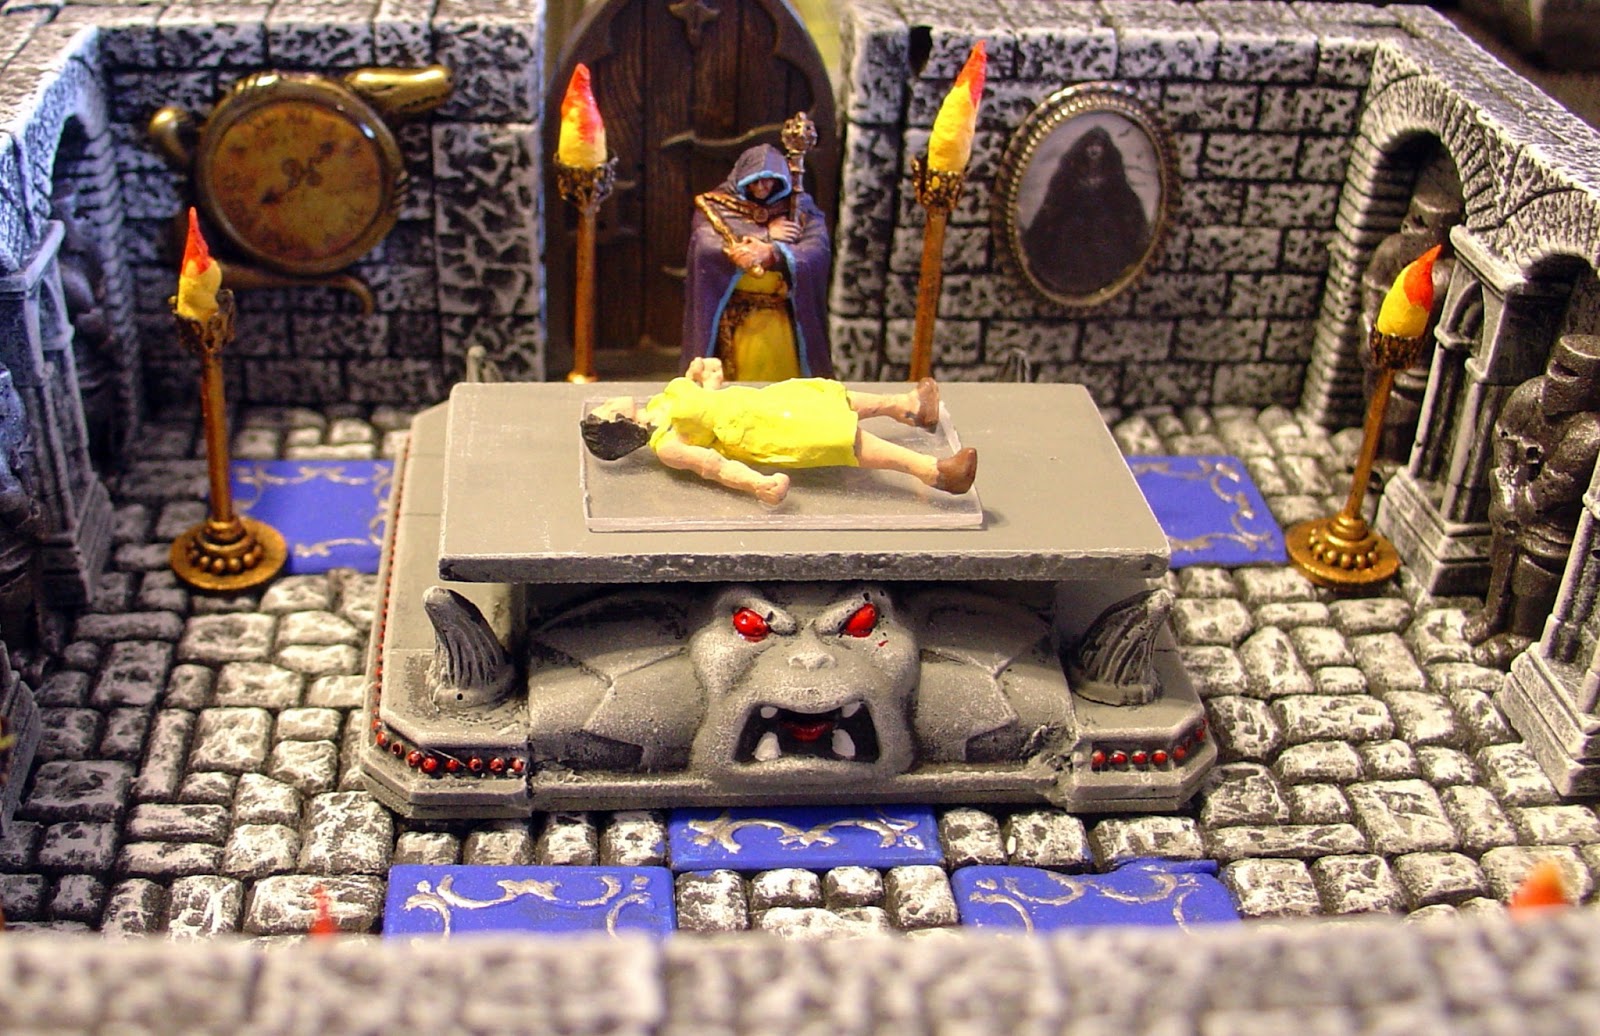
 Here's the Altar with a couple of the new torches, and a mini from the D&D boardgame Wrath of Ashardalon. The boardgame itself is pretty fun and it comes with 42 unpainted D&D minis. Those minis make a nice project by themselves. So far I've almost 15 of them finished.
 This view shows a casualty mini I made a while ago from an old Heroclix mini. Either about to be sacrificed or already was. There's an excellent tutorial for making these casualties on the Combat Zone Chronicles website, here.
 Here's the altar in place in one of the rooms. There's a few other of our recent projects pictured also. The torches, portrait and clock.

Here are a few tapestries. These were made following the directions on the Abaroth's World website, under the heading: Additions and Adornments, under the Tips and Tricks section, here. Abaroth's World is a great site full of useful resources. You should give it a read.

Ingredients:
Toothpicks, different types of beads for the endcaps, and some textured art paper. I'm not sure if this is the same stuff Abaroth used. I bought mine at Hobby Lobby for 49 cents per 8.5 x 11.5 inch sheet.
 Dance of Death tapestry. Sufficiently creepy?
 I searched with google for "free fantasy art" images and printed out 10 different images, sized to 1.75 inches high by whatever width maintained height and width ratio. I used Gimp2 for the photo editing.
The first 2 tapestries were made using strips of the textured paper as hangers from the toothpick rods. The last tapestry (above) has the tapestry glued directly to the rod. I think I like the style with the cloth hanger pieces better.

Idols 
Here are a couple of Idols from another custom mold. I think these originally were part of some toy. A Hirst Arts friend sent me one a while back.
Idols in place in one of the rooms. These were painted with FolkArt Antique Metallic Copper, given a black "magic wash", and then the eyes were hit with Tamiya Clear Green.
Here's the idols with a 28mm mini for scale.
Added in the Altar.

Thanks for looking.

Tuesday, May 14, 2013

More Stuff for the Dungeon

Hi, folks. We have a few more things for the dungeon. No real tutorials made or necessary for these. First up: Rugs.

I ordered a couple of rugs I saw pictured in a post on the Dwarven Forge forums. The supplier is a gentleman from Istanbul, Turkey. I ordered a couple of the extra-small rugs for $2.50 each. Free shipping. I received the rugs about 2 weeks after payment, which is what they specify on their website, here. They are perfect and I'm sure I will be ordering more and larger rugs soon.

The first one. I was thinking about printing out pictures of rugs, but I'm glad I went with the real thing. I was amazed at the quality of the weave. Even my wife liked them. :)
The second one. 

I think these rugs are very cool and really help make a dungeon a home. :)

How about another rug. This is a bear skin rug I sculpted from Sculpey Polymer clay. Sorry, no tutorial on this one either. I just took a piece of clay, flattened it, shaped it and cut away everything that didn't look like a bear. Then I painted it.
Hmm, I never said it was good. :) But it is vaguely bear shaped. This one looks a lot better the further you get from it. You can also buy miniature bearskin rugs pre-made from a number of manufacturers.

Okay, here's the next couple. A portrait and a wall clock.
The Portrait
I picked up a pony tail holder from Hobby Lobby. I cut off the piece on the back securing the elastic ring to the metal bezel. Found a picture I liked with Google, printed it out and glued it to the bezel. Stuck it on the wall with poster-tac.
There it is. A nice little framed portrait. You can swap out different pictures if you like. You could also buy some reflective material to insert in the frame for a mirror, instead.
The Clock
Another find from the bead aisle. I kinda liked the lizard frame.
I trimmed off the little ring from the frame and stuck it on the wall with post-tac.
Clock and Portrait
So if you have some blank wall space or floor space you want to fill, here's a few options. 

Thanks for looking and I hope you found this helpful.